Practical Guide to Installing a Starlink Satellite Antenna at Home
- Clear steps for mounting, cabling, and pointing your Starlink dish without guesswork.
- Pro tips for roofs, poles, ground mounts, and avoiding obstructions that kill speed.
- Network setup that actually works – router, mesh, and bypass mode made simple.
- Real fixes for slow speeds, dropouts, snow, rain, and cable issues.
- Comparison with HughesNet, Viasat, OneWeb, Amazon Kuiper, Iridium, Dish Network, DirecTV, and Sky Broadband.
You want fast internet without waiting for a fiber trench. That’s why Starlink from SpaceX is so interesting for homes off the grid, farms, cabins, and places where DSL or cable crawls. I’ve helped neighbors and clients install dishes in wind, heat, and a surprise hailstorm. The pattern is always the same: if you get the location right and the network set up cleanly, you’ll feel like you upgraded your address overnight.
Here you’ll find a practical walkthrough with the exact gear, the order of steps, and the gotchas people hit on day one. I’ll show you how to pick a mount, how to keep trees from killing your signal, and how to set up Wi Fi that reaches the far bedroom without dropping Zoom. I’ll also share fixes that have saved me weekend service calls. If you want more visual help, I’ll point to solid references and a couple of videos that match what you’ll see in the box. No fluff – just what works.
How do I install a Starlink satellite dish at home step by step?
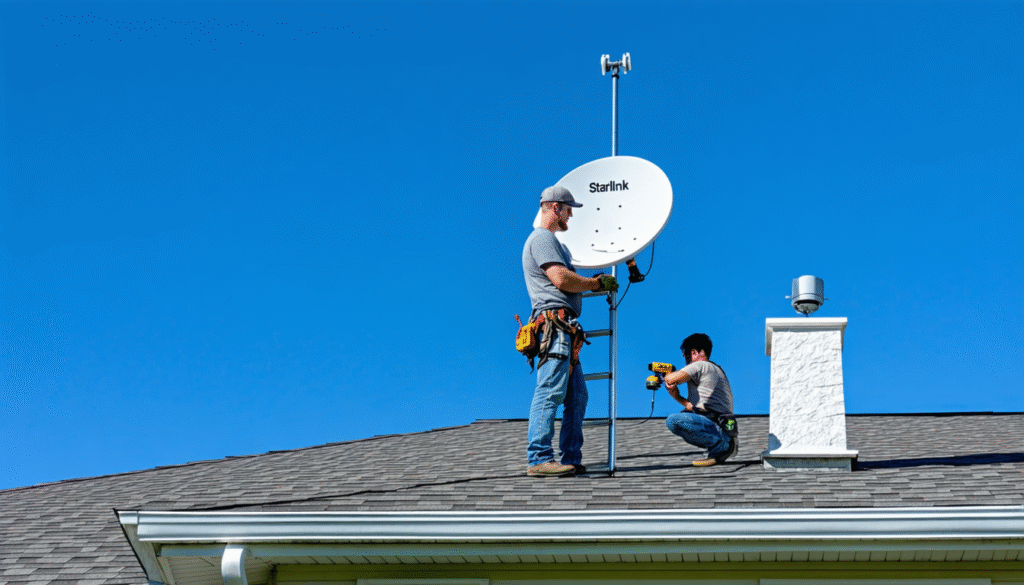
I still remember helping Ben, a contractor who lives on a ridge road, unbox his kit after lunch. We laid the parts on a clean blanket and did a quick site check before even touching a drill. That small pause saved us from redoing the mount later. The order matters. Here’s the sequence I use on every job, and it keeps surprises to a minimum.
Start with the official paperwork and visuals. The current standard kit guide is clear on parts, angles, and safety. You can read the PDF here: standard kit installation guide. For a short reference on clear sky view and obstructions, Starlink’s help page is simple to skim: keeping a clear view of the sky. If you like step videos, this is a helpful walk‑through: step‑by‑step video guide.
- Unbox and verify parts – dish, mount, cable, router, power supply.
- Run the app and use the obstruction tool to test your planned spot.
- Dry fit the mount and route for the cable before drilling anything.
- Seal penetrations as you go – no open holes, even for a minute.
- Power up last, then name the Wi Fi and set a strong password.
Before drilling, open the Starlink app and scan the sky where you plan to mount. If the app shows frequent obstructions, try a higher point or a cleaner azimuth. Guides with photos and common mistakes are helpful for planning, like this walkthrough on installing Starlink and configuring your network and this step list from Web de France. For gear ideas and a quick checklist, this resource is clear and visual: mounting tips for Starlink.
When Ben and I chose a pole mount by the shed, we kept the cable run under 50 meters and used gentle curves. Sharp bends hurt throughput. I’ve seen a dish lose 20 to 30 percent speed from a kinked line. Once the mount was in, we pushed the dish into the mast, clicked the cable, then brought the line inside through a neat 10 mm hole with a grommet and exterior sealant. Only then did we power up the router and finish the app setup. If you prefer a local French walkthrough with photos, this guide is handy: how to install Starlink at home.
| Item | Purpose | Pro tip |
|---|---|---|
| Starlink dish | Receives LEO signal from SpaceX satellites | Leave sky view free of trees and chimneys |
| Mount or mast | Secures dish in wind and weather | Use lag screws into rafters or solid post |
| 30 m – 50 m cable | Powers and connects the dish | No sharp bends – wide, gentle curves only |
| Router | Creates Wi Fi network | Place centrally and off the floor |
| Sealant and grommet | Keeps water out | Seal every penetration the same day |
How long does Starlink installation take?
For a simple ground or pole mount, I budget 90 minutes. A roof job takes 2 to 3 hours with safe ladder placement and sealing. If you get stuck on any step, this long-form guide is thorough: complete Starlink setup guide. If you prefer to hire someone for roof work, check a local pro like antenna installers experienced with Starlink.
Want a visual refresher before you start? Search this and watch the first two results to see the process in real time.
When you follow the sequence above, the dish usually comes online within minutes, and you avoid drilling twice or running a sloppy cable that you’ll regret later.
Site survey and mounting options for a clean Starlink install
The best Starlink installs start on the ground with a simple sky check. Obstructions are the number one speed killer. Branch tips, a vent stack, even the neighbor’s poplar can cause brief dropouts that feel like the internet is teasing you. The Starlink app’s obstruction tool is your friend. Walk around your property, hold the phone at the exact height of your planned mast, and check the arc the satellites travel through. If the ring shows red slices, move.
Mounts fall into three buckets: ground or pole, wall or eave, and roof base. Ground and pole mounts are predictable and safe to work on. Wall mounts are tidy and keep cable runs short. Roof mounts give the cleanest view but need care with waterproofing. For a photo-rich run-through of these choices, this explanation is helpful: practical installation choices, plus the official reminder on obstructions: clear sky view guidance.
- Ground pole – easiest to service, often best for windy regions.
- Wall or eave – short cable run, neat look, watch soffit strength.
- Tripod roof – cleanest view, needs careful sealing into rafters.
- Non-penetrating roof base – ballast blocks, good on flat roofs.
- Temporary stand – only for testing, not for winter or storms.
People often confuse TV dishes and internet satellites. DirecTV and Dish Network mounts sit low and point at a single geostationary slot. Starlink tracks a moving LEO network, so clutter that a TV dish would ignore can disrupt you here. Roof safety rules also differ because Starlink masts are a bit higher and see more wind load. If you plan to mount near trees, remember that growth adds a few inches per season. Leave margin.
| Mount type | Skill level | Pros | Trade‑offs |
|---|---|---|---|
| Ground pole in concrete | Medium | Safe access, solid in wind | Longer cable run |
| Wall or eave bracket | Medium | Short cable, tidy | Limited height, soffit strength varies |
| Tripod roof mount | Advanced | Best sky view | Roof work, water sealing required |
| Non‑penetrating roof base | Medium | No holes, great for flat roofs | Heavy ballast, wind planning |
| Temporary stand | Easy | Quick testing | Not weather safe |
What roof mount is best for Starlink?
If you need height and have a pitched roof, a tripod into rafters with butyl tape under the feet, lag screws into solid wood, and roofing sealant on top is my go‑to. Keep the mast short to cut wind leverage. If you live where wind is brutal, a ground pole set 60 cm in concrete is calmer. For planning photos and common mistakes to avoid, this guide is clear: site planning and network setup and this full walkthrough: detailed installation steps.
Weather matters too. Rain and snow can change link quality for any satellite system. Practical testing shows speed drops can happen in heavy weather, but good placement and clear sky view soften the hit. A field write‑up you can check is here: does weather affect Starlink speeds. If you are new to ladders or sealing, hire a pro and skip risky roof work. A local installer such as antenna specialists can handle it in a morning.
Pick the mount that gives the cleanest sky ring in the app with the least trenching or roof risk. That single choice is half the battle.
Starlink network setup: router, Wi Fi, and mesh configuration that actually works
Once the dish is live, the next bottleneck is almost always Wi Fi placement and settings. I see two repeat issues in homes: the router is crammed in a corner near the electrical panel, and the SSID is left at the default name. Both reduce coverage and invite interference. Move the router as central as your cable allows and lift it 1 to 1.5 meters off the floor.
Open the Starlink app, set a simple SSID and a strong passphrase. If you want your own router, switch the Starlink unit to bypass mode and let your preferred mesh handle Wi Fi. Many households already have a mesh from Eero, Orbi, Google, or TP‑Link. Bypass removes double NAT and makes gaming and smart home gear happier. A helpful install checklist is here: step by step Starlink setup, and this guide with screenshots is handy too: home configuration walkthrough.
- Router placement – central, off the floor, away from metal and mirrors.
- SSID – short name, no personal info, use WPA2 or WPA3.
- Bypass mode – if you run your own router or mesh system.
- Firmware updates – leave auto updates on for the Starlink gear.
- Channel choices – avoid crowded 2.4 GHz if you can use 5 GHz.
If you hit odd issues on day one – like the app refusing to save the SSID or devices stuck on 2.4 GHz – this troubleshooting write‑up covers common traps: 5 common Starlink setup issues and fixes. For a video refresher that mirrors the real kit screens, the tutorial linked earlier is worth a quick watch: guided configuration video.
| Network mode | Pros | When to use |
|---|---|---|
| Starlink router only | Simple, auto updates, fewer boxes | Small homes or apartments |
| Starlink + Starlink mesh | One app, matched radios | Medium homes with simple needs |
| Bypass + third‑party mesh | Best coverage and features | Larger homes or many devices |
| Ethernet to PC or switch | Low latency, stable speed | Gaming, work calls, NAS |
Do I need bypass mode to use my own router?
Yes. Turn on bypass so your router gets the public IP and you avoid double NAT. Then control Wi Fi and DHCP from your own gear. If you come from an ISP like Sky Broadband and already have a mesh layout you love, this keeps your home network feel the same. For more background and field stories, this article reads well: Starlink in remote homes.
If you want a hands-on look at mesh layouts and cable runs, search and watch a couple of practical install videos like this:
With the router placed well and bypass set when needed, your Wi Fi becomes the least of your worries, and your speeds reflect what the dish can actually pull.
Why is my Starlink slow or dropping? Real fixes that solve the problem
Here’s the truth: most speed or stability pain comes from three things – obstructions, weather, or cabling. A weekend ago, a rancher texted me a screenshot of speeds swinging from 180 Mbps to 6 Mbps. The culprit was a single pine branch tip that grew over summer into the path. We trimmed it, and the graph flattened out.
Weather can make a dent. SpaceX keeps pushing improvements with fresh satellites and software, but rain fade and wet snow affect any radio link. A field note worth reading: how weather affects Starlink. On the positive side, coverage and capacity get better as launches continue. Recent Falcon 9 flights added density, which you can track in summaries like fresh batch of Starlink satellites and network boosted with Falcon 9.
- Run the app obstruction check again at dish height – look for new red slices.
- Clear ice and wet snow gently – the dish has heaters, but heavy buildup slows the link.
- Inspect cable ends for moisture or damage – reseat until you hear a click.
- Move the router out of closets or basements – Wi Fi placement matters.
- Check for double NAT – turn on bypass if you use your own router.
Regional performance varies as beams shift and load changes. If you want a sense of how a region behaves under load, this snapshot is useful: Starlink speeds in Western Australia. As SpaceX rolls out newer hardware and software – sometimes called V3 in community chatter – users report smoother throughput and better beam handoffs. You can skim a summary here: Starlink V3 notes.
| Symptom | Likely cause | Quick fix |
|---|---|---|
| Speed swings from fast to very slow | Tree tip or chimney creating intermittent block | Trim or move the mast 1 – 2 meters |
| Drops during heavy rain or snow | Weather attenuation | Wait out the cell, clear heavy snow, keep sky path clean |
| Wi Fi great near router, bad upstairs | Router in a corner or behind metal | Reposition or add mesh node |
| Random app errors on setup | Double NAT or old firmware | Enable bypass or update gear |
| Stutters only on video calls | Packet loss from cable bend or moisture | Inspect and reseat cable, avoid sharp angles |
Why is my Starlink speed slow today?
Run three checks in this order. First, obstruction scan in the app. Second, weather radar – is there a cell passing? Third, plug a laptop by Ethernet into the router to isolate Wi Fi. If wired speed is fine, you need better Wi Fi placement or a mesh node. For day‑one snags, this troubleshooting page is spot on: common setup issues and fixes. If you want big‑picture context on capacity and the market tension that affects spectrum and service, skim this roundup: satellite internet deals and launches.
Fix the root cause – obstruction, weather, or cabling – and your speeds settle down without fancy tweaks.
Starlink vs HughesNet, Viasat, OneWeb, Amazon Kuiper, Iridium, Dish Network and DirecTV: which should you pick?
People ask me this every week, especially in rural pockets where legacy satellite was the only option. Starlink runs on a low‑Earth orbit network from SpaceX, so latency is usually many times lower than geostationary services. That alone changes live calls and gaming. But the right answer depends on your home, your budget, and your use case. HughesNet and Viasat have wide footprints and predictable billing.
OneWeb focuses on enterprise and community links with LEO tech of its own. Amazon Kuiper is ramping up, which keeps pressure on everybody. Iridium serves low‑bandwidth devices and phones in remote areas. Sky Broadband is a landline ISP in the UK that some readers are switching from when copper lines top out at low speeds. Dish Network and DirecTV are satellite TV services – I mention them here because people see the old TV dish on the roof and think it’s the same game. It’s not.
- Starlink – lower latency, strong for real‑time use, easy self‑install.
- HughesNet and Viasat – GEO coverage, higher latency, stable plans.
- OneWeb – LEO focus with enterprise and community deployments.
- Amazon Kuiper – emerging competitor adding fresh capacity.
- Iridium – global low‑bandwidth, satellite phones, IoT devices.
The competitive picture is shifting. If you want a readable recap of how Amazon is pushing in, see this note: Amazon challenges Starlink in Europe. Broader overviews of new launches and market moves help set expectations too: market and launch roundup. For the nuts and bolts of how installations work and what to expect on day one, I still like these practical guides: full installation guide and the official PDF again for reference: Starlink standard kit manual.
| Provider | Typical latency | Throughput range | Best for | Notes |
|---|---|---|---|---|
| Starlink | ~25 – 60 ms | Varies by region, often 50 – 250 Mbps | Video calls, streaming, gaming | Self‑install kit, improving capacity with launches |
| HughesNet | ~500 – 700 ms | Lower speeds, data plans vary | Email, browsing, non‑real‑time use | GEO satellites, predictable coverage |
| Viasat | ~500 – 700 ms | Lower to moderate speeds | Basic streaming, browsing | GEO satellites, plan‑based performance |
| OneWeb | ~70 – 100 ms | Enterprise‑grade links | Business, community, backhaul | LEO network, partner‑led installs |
| Amazon Kuiper | Developing | Developing | Future consumer and enterprise | Competitive pressure will help pricing and capacity |
| Iridium | High for data | Very low bandwidth | Satellite phones, IoT, tracking | Global reach, niche use |
| Sky Broadband | ~10 – 30 ms | Depends on DSL or fiber plan | Homes with fixed lines available | Good if fiber is at your address |
Is Starlink better than Viasat or HughesNet?
For video calls, gaming, and anything interactive, yes, the lower latency feels night and day. For a set‑and‑forget browsing setup with known monthly costs, some households stay with HughesNet or Viasat because their needs are simple and the install already exists. If you care about future capacity, Starlink’s ongoing launches keep adding throughput – see recent notes here: recent satellite batches. If you’re choosing today and live in deep rural, Starlink is usually the fastest path to a modern connection.
Pick the tool that matches your life. If fiber shows up later, you can always switch. Until then, Starlink gets most homes back to normal internet life quickly.
Pro tips and safety checks that make your Starlink install last
What separates a good install from a great one is the small stuff. The dish will snake for satellites all day. Your job is to give it a rock‑solid home and a clean path. That means thinking like water and wind for the next five years, not just today.
Here is the checklist I run before packing up my tools at a client’s place. It keeps leaks away, makes service easier, and helps your family forget this thing is even up there.
- Seal every hole – butyl under the foot, lag into structure, exterior sealant over screws.
- Drip loop at entry point so rain falls away from the hole.
- Label the cable at both ends for easy swaps later.
- Ground the mast as per local code if you used a metal pole.
- Photo log of the mount and cable path for future repairs.
For references you can keep, bookmark the official manual: Starlink installation manual and this quick overview article you can share with family: simple home install overview.
| Check | Why it matters | What to look for |
|---|---|---|
| Fastener depth | Stops mast wobble and loosening | Lag screws into solid wood, not just sheathing |
| Cable strain relief | Prevents connector damage | No tugging, gentle service loop near dish |
| Water path | Protects the building envelope | Drip loop, sealed entry, no uphill cable runs |
| Router placement | Improves Wi Fi coverage | Central location, shelf height, away from metal |
| App health | Confirms clean sky view | No red slices in obstruction chart |
What if I change providers later?
If fiber arrives or you trial another service, keep the mast and cable path neat. Many providers reuse existing penetrations. If you move to a landline service like Sky Broadband or keep satellite TV from DirecTV or Dish Network, your new tech will appreciate a clean install path. If you jump back to Starlink later, you’ll be up in minutes. If you like reading about how the market is shifting and why more launches help consumers, this summary is a good coffee read: competitive landscape and launches.
Do the small things right once, and you won’t think about your dish again except when the speed test makes you smile.
Do I need a professional to install Starlink?
Most homeowners can handle a ground or wall mount with basic tools. Roof work adds risk and waterproofing steps. If ladders or sealing make you nervous, hire a local antenna installer for a half‑day job.
What affects Starlink speed the most?
Obstructions are the big one, then weather, then your home Wi Fi. Use the app’s obstruction tool, keep the dish high and clear, and place the router centrally.
Can I use my own router and mesh?
Yes. Enable bypass mode in the Starlink app so your router gets the public IP, then manage Wi Fi from your own system.
How long does it take to get online?
With a clear mount and a short cable run, many homes go from box to browsing in 60 to 90 minutes. Roof installs can take 2 to 3 hours.
Is Starlink better than HughesNet or Viasat for video calls?
Usually yes. The lower latency of LEO satellites makes calls and gaming feel smoother than GEO services. Actual results depend on your placement and local load.